Monday, July 2, 2012

Re-purposed

I enjoy a nice glass of wine...I more frequently enjoy a cheap glass of wine. I didn't drink at all while pregnant and since I'm still breastfeeding I still only partake on occasion. Rather than open a whole bottle of wine for myself I have become quite the fan of the little single serving wines. I also like to buy white wine in these because then I always have some on hand for cooking or for company. As a rule, I only drink red wine because I find white wine too sweet of the health benefits.

I may or may not have continued to buy these wines because I'm a big fan of the little mini wine bottles. 


Come on aren't they cute! 


I now have built up a little collection and I think they make the perfect little vases. I washed them and took the labeling and glue off. Then cut off the little metal band. Then they are ready to go. So simple and so green of me. 

I love these because they work so well for clippings from the garden. I love having fresh flowers and greenery in the home. I usually just meander around the yard and bring in whatever I can find. Today it was rosemary because it is summer in Florida and not a lot else is growing right now.


I love the simplicity of one flower or cutting in an arrangement. It seems so restful to me. Also, it is way easier to "arrange". 

It doesn't get much simpler than that! Oh and practically FREE of course.

Saturday, June 30, 2012

Bugs Be Gone

I detest, abhor, loathe creepy crawly things. Unfortunately, I live in Florida. Here we not only have bugs we have GIANT bugs. Seriously- grasshoppers up north are little pests you can hardly even see. In Florida grasshoppers have names like the, Giant Orange Grasshopper. This seems to hold true for most bugs-they are all bigger in Florida (don't tell Texas).

Pre-Tate we would routinely "bug bomb" the house every 4 months or so. This is very effective but when I was pregnant I didn't want to use the chemicals and the idea of bringing my baby into a house with chemical residue all over it makes my skin crawl worse than the thought of bugs! As the Florida summer has set in I am finding "visitors" more and more frequently. As luck would have it I heard Andrea Fabry of Mom's Aware on the radio and the whole program was on non-toxic pest control.

Yes, I am now the lady who: A. is listening to the Christian version of "talk radio" (love me some Moody Radio), B. hears the radio program topic is on non-toxic pest control and gets overly excited about it, and C. is disappointed when I arrive at my destination and have to miss the end of the broadcast.

Well I may have missed the end of the broadcast I did go to the Mom's Aware website and they have several recipes for natural non-toxic pest control.

We are currently battling against ants and your garden variety of pests.

Ant Trap
1 Tablespoon Hot Water
1 Tablespoon Honey or Sugar
1/2 Teaspoon Borax*

*Please note that while Borax is considered a natural pest control solution that the ingestion of it by pets and/or people is still harmful. She went into detail about this on the radio broadcast seems like common sense that if it kills ants who eat it that it probably wouldn't be good for pets but I don't want to be responsible for Fluffy's emergency vet trip.


Place all ingredients in jar and shake to mix. Soak cotton ball in mixture and squeeze out excess liquid. Place cotton ball on lid, plate, etc. in area where ants are. Leave it there until the ants are gone. Dispose of cotton ball.


I'm currently working on a natural broad spectrum pest powder. Mom's Aware website has one but it called for A LOT of ingredients that I didn't have readily available and there are some that I do have that I am pretty sure will get the job done. If my pest control powder is a success I will post about it.

Sunday, June 24, 2012

Meal Plan Monday

Pre-baby I often times went to the grocery store several times a week. It was practically on my way home from work and so it didn't seem like such a bad idea. When I was pregnant I realized that it would be much more feasible to just go to the grocery store once a week. This required  me to start thinking about what we would eat for dinner before 5:00 PM each day. I started  meal planning while I was pregnant to get in the swing of things and now with Tate being almost 5 months we are still going strong (with occasional lapses).

This photo has nothing to do with this post. Just gratuitous cuteness.


I'm sure there are a million ways to meal plan but here is what works for me- on Sundays I get the paper and go through the coupons. I then pull up my grocery store's circular online and check to see what is on sale that I also have a coupon for (this is more for dry goods and household items as there are rarely coupons for meat, vegetables, etc). I usually try and incorporate whatever meat item is on sale into one meal that week. When boneless skinless chicken is on sale I stock up and freeze it and then just take out a package as needed. I then make up a grocery list of what I need.

So here we go our meal plan for this week:

Monday- Chex Crusted Chicken with Oven Roasted Asparagus

Tuesday- Grilled Marinated Sirloin Steaks (on sale this week) and Grilled Vegetables

Wednesday- Pesto Chicken with Grape Tomatoes and Broccoli (recipe below)

Thursday- Blue Cheese Tomato Sauce with Chicken and Spinach (adapted from The Pioneer Woman)

Friday- Parmesan and Mushroom Risotto with Chicken (recipe to come next week)

I don't plan Saturday and Sunday because despite my best efforts it never works out every night of the week so this way there is flexibility. Additionally, every week I try to incorporate one new recipe. I started doing this when I was pregnant and realized that I didn't have a lot of "quick and easy" dinners. This week's new "recipe" is the Chex Crusted Chicken. I don't actually have a recipe but I have had a box of Chex cereal in my cupboard since Christmas (unopened) and I'm tired of it staring at me from the pantry. If the Chex Chicken is a success I will blog about it if you don't see it in the next few days well you will know why...

If you've never had homemade pesto you have to try it. It puts the jarred and even most restaurant varieties to shame! Here is the recipe my family uses:


Pesto Sauce (adapted from Betty Crocker)
1 Cup fresh basil (roughly chopped)
1/3 Cup grated Parmesan
1/3 Cup olive oil
2 Tablespoons Pine Nuts (optional)
1/2 Teaspoon Salt
1/4 Teaspoon Pepper
3 Cloves Garlic


Combine all ingredients in food processor and mix until blended.

*The Betty Crocker version calls for less basil, pepper, and garlic. Its really a personal preference. Additionally, I usually make at least twice this much if we don't eat it on something (its great on pasta, bread, pizza, etc.) you can freeze it and it will keep for 3 months.

Linking to:


Thursday, June 21, 2012

Crunchy Like Granola

This post has absolutely nothing to do with granola. But rather my descent into becoming a "crunchy granola mom". It started with making my own baby food and has now led me to making my own laundry soap (stay tuned for chemical free pest control-  seriously I'm making some to deal with some ant issues- but I digress).


I had seen many a blog post about how easy, safe, and effective homemade laundry soap is. But I always bought my laundry soap on sale (BOGO and coupons- thank you Publix!) and I buy the "free" kind so I figured I was eliminating at least some of the chemicals. But recently my husband has thought that the laundry was making him itch. That was just the excuse I needed to try my hand at making laundry soap. From start to finish (including clean up and one rather large spill) this whole project took about an hour.

I followed this recipe from Liz Marie Blog that I had pinned quite some time ago. Word to the wise (and take note because you will probably never see this again) go to Walmart. Ordinarily, I find Walmart to be an exhaustive place with a terribly confusing layout and poorly trained employees. However, a trek to Target revealed that they didn't have 90% of the ingredients needed for this project (and I'm mad at Target anyway but I can't order everything off Amazon). So off to my Walmart I go- and wouldn't you know it right there in the laundry aisle is every single stinking item needed to make this laundry soap. They were all right next to each other practically begging me to take them home.

Onto the recipe-

Opps! I forgot to photograph the OxyClean. Use your imagination. 


Laundry Soap  (Makes 2 Pounds*)

1 box (4lb 12 oz) of Borax
3 bars of Fels-Naptha Soap**
1 box (4lb) of Baking Soda
1 box of Super Washing Soda
4 lbs of Oxy-Clean

*Liz Marie Blog says this makes 4 pounds but it has got to be a typo because I made it with the exact same ingredients and I even bought the same 2 pound storage container (again from Walmart).

**Other recipes I have seen say you can use any bar soap (i.e. Dove, Dial, etc. but I've also seen reviews that they can leave a little soap scum in the washer and/or on the clothes).


Step 1: You need to grate/shred the Fels-Naptha Soap. I saw on My Earth Garden this tip to microwave the soap to make it brittle. I microwaved it about 2 minutes- it kinda "bubbles" up for lack of a better word. I then removed from microwave, let it cool, and cut it into large hunks that I then sent through the food processor.


Spongy looking Fels-Naptha post-microwave.


After a quick trip around the food processor.


Step 2: Pour remaining ingredients together and combine with Fels-Naptha. I used a clean garbage bag but when you mix it all together it is really heavy so make sure your garbage bag can handle it.

Step 3: Mix up thoroughly. I used a large spoon and my hands but you could also run the entire mixture through your food processor in small batches.


Step 4: Put into your choice of storage container.

It really was as easy as everyone says. Once it was done I was so excited that I went and scrounged up a load of laundry. My clothes are clean and my HE washing machine doesn't have any residue or film. I used about 2 Tablespoons of soap for one load. I did put a 1/4 cup of vinegar mixed with a few drops of essential oils for fabric softener. I got that tip from My Earth Garden as well- in addition to softening the clothes it is supposed to help remove any soap residue. I was skeptical of the vinegar (I was convinced my clothes would come out all stinky) but it seems to have worked somewhat. Its not comparable to liquid fabric softener but they were softer than if I had used nothing.

Linking up to:

UPDATE: We have an HE washing machine- I did find that if I do not use 1/4 Cup of vinegar for fabric softener that there was some soap residue on the machine (not on the clothes). Despite my fears the clothes do not smell even remotely like vinegar however you can infuse your vinegar with scents. My machine has a compartment for fabric softener but if yours does not just add it during the rinse cycle. I will say even the dirtiest loads are clean and my hubby has stopped itching!


Wednesday, June 13, 2012

I'll Be Right Back

So I started a new job and we have all been adjusting. I will ramping back up next week!

Till then some cuteness...


Monday, June 4, 2012

Chicken and Asparagus with Goat Cheese and Sun-dried Tomatoes

After having Tate my husband wanted to lose his "baby weight". I was breastfeeding so I couldn't really diet but my husband went on a low-carb diet. I on the other hand spent my days carb loading so that at dinner I could make something low-carb*. I scoured Pinterest and the internet for recipes- there were a ton of recipes but the majority we tried were not very flavorful or were too difficult to make while the two of us juggled making dinner and appeasing the wee little tyrant that like to scream fuss from 5:30 till bedtime every night for the first two months. So we started throwing together our own recipes this one is a favorite (I also really like it with roasted red peppers in lieu of the tomatoes).


*Disclaimer: I have a degree in Religion not nutrition. I throw the word "carb" around but pretty much I mean no bread, pasta, potato, rice, etc. 


Chicken and Asparagus with Goat Cheese and Sun-dried Tomatoes

3 Boneless Skinless Chicken Breasts
1 lb of Asparagus
3 oz of Goat Cheese
3 oz of Sun-Dried Tomatoes (or 1 roasted red pepper diced)
Sliced Almonds
Olive Oil
1/2 Tbl minced Garlic
Salt Pepper


Toast almonds in a little bit of olive oil until light brown. Remove and set aside.


Cut asparagus into bite sized pieces. Toss with olive oil, salt, and pepper. Set aside.


Season chicken with salt and pepper and cut into bite sized pieces. Add chicken to pan with garlic. Cook almost through. Then add asparagus and sun dried tomatoes. When asparagus is cooked reduce heat to low, add almonds and goat cheese.  When cheese is melted it is done and it is delicious. Enjoy!


Linking to:

Friday, June 1, 2012

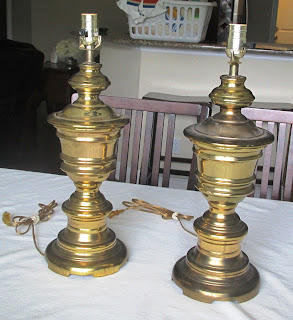
From Brassy to Classy

I love a good thrift store transformation. I usually have 5 or 6 things on a mental list that I'm on the lookout for- I rarely ever actually come home with something I was "looking" for.


For over a year I have had a BOLO out on a pair of lamps for our nightstands.


This was the lamp that was on MY nightstand. It had a mate on my husband's nightstand but I broke it. These lamps were a previous thrift store find that I transformed (they were pink ceramic) but they were clearly way too small (have I mentioned before that I am spatially challenged) so when it broke I was okay with it.


So, since that time I have searching for two matching lamps that were suitable for a makeover. I ever so briefly entertained the idea of buying new lamps (aghast!) but then I went to the store and looked at the new lamp price tag and suddenly my lonely too small lamp seemed like it would be just fine until I could find a pair of used lamps. Do you have any idea how hard it is to find a PAIR of used lamps? But today at Goodwill I saw them. They were brassy and dusty and dirty and I thought they might be too big but they worked and they were only $5.00 so they came home with me.


I cleaned them up, taped plastic bags around the electrical parts, and busted out Ol' Faithful, AKA Oil Rubbed Bronze.


I can tell you it pained me to spend $15.00 a piece on the lamp shades but then I saw this near replica to my lamps on the shelf next (photo from Target website) to the lamp shades and its $45.00 price tag (with no shade) and well $20.00 per lamp including the shade seemed like one heck of a deal.


Here is a close up of this lovely lady in her new home.


And the beautiful pair of them in our bedroom (and yes, I made the bed just for you all).

Linking up to:

Wednesday, May 30, 2012

First World Problems...

Your dog commandeering the baby toys...


Feel free to share yours!

Tuesday, May 29, 2012

Honey Pecan Glazed Chicken

This meal is so easy and quick it almost doesn't deserve to be call a recipe. I routinely throw this together on weeknights when I forgot to think about dinner until 4 o'clock and I need something I can get on the table in a jiffy. From start to finish this takes less than 30 minutes (that is with chopping your own pecans).


Honey Pecan Glazed Chicken
1 lb. of boneless skinless chicken tenders (or breast that are sliced or pounded out)
6 tbl. of honey
6 tbl. of chopped pecans
1/2 tsp. salt
1/2 tsp. black pepper
1/2 tsp. onion powder
1/2 tsp. garlic powder
1/4-1/2 tsp. cayenne pepper (the sweet and spicy makes this dish but you can eliminate/reduce cayenne on some of the chicken to make it more kid friendly).
2 tbl. Butter


Mix salt, pepper, garlic powder, onion powder and cayenne together. Season chicken breasts liberally.


Melt butter in pan over medium heat- add chicken and cook 5-6 minutes (or until almost cooked through).


Remove chicken from pan and set aside. Add honey and pecans to pan (with pan juices) and cook 5 minutes (your honey needs to come to a boil to really meld with all the pan juices and pecans).

Return chicken to pan, cover, and cook an additional 3 minutes (or until cooked through).


Linking to:


Monday, May 28, 2012

Daddy's Day DIY

Tate wanted to make his daddy a little something for his first Father's Day- he was thinking a poopy diaper but I steered him in another direction.


I have used salt dough in the past for Christmas gift tags and decorations when I saw this on Pinterest from The Imagination Tree it got me thinking. I liked the idea but knew I would want to execute it differently.


Supplies

1 Cup Salt
1 Cup Flour
Up to 1/2 Cup of Water
Ribbon/Twine


Salt Dough

Mix the salt and flour together and add water.


Knead until smooth. 


Roll out to desired thickness. I chose 1/2 an inch thin enough to hang but not so thin it will be too fragile.  I rolled it out directly onto cookie sheet to minimize any tearing, stretching.


Imprint child's foot, hand, etc. (I tried to get a hand too but Tate was not cooperating)


Cut around impression using bowl, cookie cutter, etc. (I used a vase)

Peel away excess dough and put two small holes at the top (I used the end of a paint brush) for hanging.

Bake at 170 degrees (that is as low as my oven goes) for 2 hours.


Cool and let sit overnight. Pay no attention to the other empty salt dough, those were a craft fail. But I am currently rethinking the process on those and will blog all about it when if I get it right.

The salt dough has a tendency to have not the cleanest of cuts. I just sanded the edges of my dried plaque to remove the stragglers. You could paint here if you wanted to but I kind of like the natural creamy color of the salt dough.


Thread ribbon through to complete.

There you have it. I know Father's Day is still a ways away but I wanted to share this in case anyone else was in need of a little gift inspiration!


Sunday, May 27, 2012

Keep It Simple Apple Pie

So often we complicate things and in the process forget how good simple pleasures can be. This apple pie is just that, one of life's simple pleasures. There are no fancy ingredients, no complicated vanilla bean caramel rum sauce, just apples, sugar and cinnamon. But from humble beginnings something truly amazing is born. This is the apple pie of my childhood (literally, I grew up making this along side my mama) and it is still an absolute favorite of mine.


So in honor of Memorial Day (because what's more American than Apple Pie) here is without further adieu, Apple Pie with Dutch Crumb Topping- I would love to site a source for this recipe but it is unknown.


Apple Pie Filling
4-5 Granny Smith Apples
1/2 Cup Sugar
2 Teaspoons Cinnamon

Dutch Crumb Topping
3/4 Cup Sugar
1 Cup Flour
1/2 Cup of Butter (softened)

1 Pie Crust (I used frozen prepared crust because like I said I'm keeping it simple)

Preheat Oven to 450 degrees.


Peel, core and pare apples. Placing the already sliced apples in ice water while cutting up the remaining apples keeps them fresher.


Mix 1/2 Cup Sugar and 2 Teaspoons Cinnamon in a small dish. 


Drain apples and place in pie crust. Sprinkle sugar cinnamon mixture over the apples.The apples cook down significantly so I pile them in there, if you want a less full pie just use less apples. 


Mix remaining 3/4 Cup Sugar and 1 Cup Flour in large bowl. Cut in butter using a pastry blender (or in lieu of a pastry blender you can use a fork just make sure your butter is very soft).


Cover pie with crumb topping. 


Bake at 450 degrees for 10 minutes. Reduce heat to 350 and cook an additional 40 minutes. I check it at about 20 minutes in to see if the crust edges are browning too much. If they are (and they always seem to be) I use aluminum foil to prevent further browning. 


Hope you all have an amazing Memorial Day! 

"Land of the free because of the brave"