Showing posts with label Crafts. Show all posts

Monday, May 28, 2012

Daddy's Day DIY

Tate wanted to make his daddy a little something for his first Father's Day- he was thinking a poopy diaper but I steered him in another direction.


I have used salt dough in the past for Christmas gift tags and decorations when I saw this on Pinterest from The Imagination Tree it got me thinking. I liked the idea but knew I would want to execute it differently.


Supplies

1 Cup Salt
1 Cup Flour
Up to 1/2 Cup of Water
Ribbon/Twine


Salt Dough

Mix the salt and flour together and add water.


Knead until smooth. 


Roll out to desired thickness. I chose 1/2 an inch thin enough to hang but not so thin it will be too fragile.  I rolled it out directly onto cookie sheet to minimize any tearing, stretching.


Imprint child's foot, hand, etc. (I tried to get a hand too but Tate was not cooperating)


Cut around impression using bowl, cookie cutter, etc. (I used a vase)

Peel away excess dough and put two small holes at the top (I used the end of a paint brush) for hanging.

Bake at 170 degrees (that is as low as my oven goes) for 2 hours.


Cool and let sit overnight. Pay no attention to the other empty salt dough, those were a craft fail. But I am currently rethinking the process on those and will blog all about it when if I get it right.

The salt dough has a tendency to have not the cleanest of cuts. I just sanded the edges of my dried plaque to remove the stragglers. You could paint here if you wanted to but I kind of like the natural creamy color of the salt dough.


Thread ribbon through to complete.

There you have it. I know Father's Day is still a ways away but I wanted to share this in case anyone else was in need of a little gift inspiration!


Monday, May 21, 2012

Getting Crafty

I may know my way around a power sander and a paint brush but I don't consider myself terribly crafty. Though, I do come from a long line of amazingly crafty ladies on my mother's side. Maybe it skipped a generation...however when itty bitty baby items were taking over my cupboards and closets I realized I needed more closets some way to contain it all. So I headed to the thrifty lady's organizational mecca- Ikea. There in the showrooms I found a storage container for every possible type of clutter I could ever hope to own. And then I wandered around to the store and was taken aback! Ikea you are supposed to be CHEAP! Ikea you even require assembly of small storage containers! Ikea this is just a cardboard box covered in fabric why would I pay you $10.00 for it! And there it came to me-I have cardboard boxes, I have random bits of fabric, why not make my own fabric covered cardboard boxes for the purpose of corralling baby related clutter? And so I did.

From This


To This

What follows is my very real attempt at a tutorial. This tutorial makes this project seem way more complicated than it is. In reality this took only slightly longer than assembling the Ikea fabric covered box (I bought a few because I didn't know if this was going to be a craft fail or not).


Supplies
1 Box- I used a shoe box but you could use anything
Fabric- I used an old tablecloth that shrank
Scissors
Glue
Foam Brush (optional)


You will want enough fabric to wrap around the box you chose. I eyeballed everything because measurements and spatial skills are not my strong suit. 


Mark with a pen (I put masking tape to make it more visible for photos) your cuts. You want to cut away the edges of the fabric to leave a cross or plus sign when all cuts are made. IMPORTANT: In order to create the finished edges you need to leave yourself just a little extra fabric (1/4 of an inch)


After you cut out all the corners this is what your fabric should look like.


The apply a liberal amount of glue to the bottom of your box (I use the foam brush to spread it evenly but you could use your finger) and position it in the center of your fabric. Turn over and push the fabric into the glue making sure to get out any air bubbles.


Then apply glue to the side of box and bring up the corresponding panel of fabric and adhere to the box. You should have 1/4 of an inch of fabric hanging over on each edge. Then glue the fabric to the inside of the box. Pulling tight and making sure there are no air bubbles.


The ends of box should each have that 1/4 inch of fabric hanging over like so.

Repeat the above steps for the other long side of box (or if your box is square just the corresponding side).

Once both sides are done (two glued on and two naked) place a line of glue along the box next to the fabric overhang. Fold the overhang around the corner of the box and press down tightly.


Repeat for all the fabric overhangs (there should be four). Then spread glue along the two remaining sides of the box and bring up the fabric panel. Apply glue on top of the fabric overhang that you folded down and then fold in the corresponding fabric overhangs on the panels that are not yet in place. 


The finished corners should look like this. Then glue the fabric inside the box.


If your box has a top then simply repeat the same steps for the box top.


Here is my finished product next to the box I bought from Ikea. I think I like mine better.


Monday, May 14, 2012

Create Your Own Artwork


There is a theme with all the artwork in our house. It was all cheap (surprise) and is almost all black and white. I am just drawn to it for some reason.

If you've never visited the Graphics Fairy its a treasure trove of free clip art and printables. The link is to the images I used in Tate's room. I think I went through just about every single black and white clip art there is on the site and these were my favorites. I was in dire need of some art for the walls in Tate's nursery and the budget was as close to $0.00 without going over. Once I had the images I wanted to use I took some thick resume paper (because we had it laying around) and printed it but the paper was still to pristine looking for the effect I wanted.

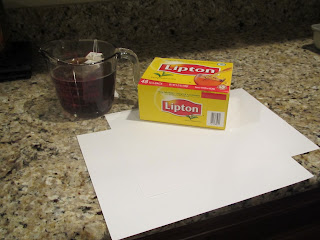
We had plain white resume paper laying around. Please excuse the packaging-Diesel was working on his resume.


I experimented with tea and coffee staining the paper. I initially used the leftover coffee from my morning brew- the coffee was too dark and uneven for the look I was going for so I brewed up some strong black tea and tried again.

I soaked the pages in the tea for about 10 minutes making certain to cover the entire paper evenly.

Then I placed them on cooling racks over kitchen towels to dry while I was at work.

When I came home the pages were dry but slightly wrinkled so I lightly ironed them with the towel over the top.

Final product- perfectly aged paper ready for printing! There is a more noticeable difference in the two papers in person. The camera doesn't pick it up very well. I then just fed the paper into the printer through the bypass tray (the stiffness of the paper jammed my printer's regular feed) and printed out my images.


Linking to: